Friday, June 7, 2013

Cisco UCS Enable TACACS+ authentication.

You need to configure the TACACS+ server ( Cisco ACS in my case) and assign the right shell values to the groups.

In the Cisco UCS add a TACACS+ provider in the Admin  tab user management > TACACS+ > TACACS+ Providers.
Click on the green plus button to add a provider. In my case its the ACS server.

Enter the IP address of the ACS server
Enter the shared secret key provided by the ACS admin


Add the provider to the provider group.

On the TACACS+ provider group click the green plus sign to add a provider to the group.
Give the group a name
Highlight the provider we added on the left window and click on the >> sigh to add the provider to the group.


Create an Authentication domain:

On the Authentication domain , add a new authentication domain and give the Provider group you just created in the drop down list and choose realm as tacacs.


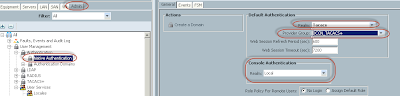
Go to the Native Authentication  and change the default Authentication to TACACS.
here is the critical part, leave the Console Authentication to Local in case your tacacs configuration didn't work and you are kicked out of the GUI, you can still login via console and reset things.


You will automatically logged out from the GUI after some time and you need to login with your login id which authenticates with tacacs server.
You have drop down list in the domain column and choose the tacacs domain you created a while ago.


If you are not able to log-in and get an error troubleshoot it with tacacs+ server settings, Also note that you are not able to log-in because you choose no-login as the Role policy for remote users in the Native authentication page.
If you choose Assign default role there then you will be given login access but read-only. UCS by default assigns read only role to the users who is not configured locally.


If you have trouble and  want to revert back the configuration:

SSH as admin into the primary/cluster IP address and  set the default-auth to local


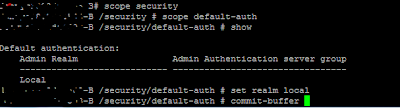
then log back as local user ( native)


Cisco UCS enable multicast policy for Redhat cluster

Recently I got a request to enable multicast on the Cisco UCS so that the RedHat cluster can exchange heartbeat through multicast.

By default IGMP snooping is enabled in the cisco UCS through the default multicast policy.


Create a multicast policy with IGMP snooping disabled.


Attact that policy to the VLAN you created for the Redhat cluster heartbeat( multicast).


After making the changes try pinging from the Linux host through the multicast interface you will get multiply reply depend on how many node in the cluster.

You need to configure IGMP snooping on the nexus switch too if the traffic is passing through the Nexus.


Wednesday, August 22, 2012

UCS and Fabric Interconnect firmware update

Updating the firmware of UCS IO modules, Adapter, Bios, CIMC controller and FI are straight forward and you can do it from the UCS manager.

The firmware before upgrade is 2.0(2q). I'm upgrading to 2.0(3a).

1) The image below shows the old firmware.

Click on the equipment --Firmware Management--Installed firmware


scroll down to see the  Fabric Interconnect  firmware


Click on the packages tab on  the same folder to see what firmware packages are available on the Interconnect.
Look at the version field to see what version is available.  Here I can see the existing version firmware bundle. I need to download the new version from the Cisco site and needs to upload it to the FI.

Since I have only B series servers  and  FI, I'm downloading B series bundle and Infra bundle.

You can also notice the state as active.


Now go ahead and download the bundle from the CISCO site (need authorised login) to the laptop and upload it to the FI. Before uploading you need to check enough space available on the FI.

Go to equipment--primary Fabric Interconnect--General tab.
Look for the Total Memory and available memory. Here we have enough memory to upload.
if you look at the botflash only 16% is used.


Click on the download task on the same page and click download Firmware, a download firmware window will appear.


Browse and choose the local file system , which choose the  file from the local disk/laptop and start upload to Fabric Interconnect.


Once uploaded completely you can see the status on the general tab of the bottom pane.


On the same windows click on the update firmware tab


You will get the update firmware window.
On this window you can see the Running version, start-up version and backup version.
You can see a drop down list for backup version for each upgradable components.


Choose the latest version in the drop down list for each component and then click the apply button
you can see the status of the component changing from ready to scheduled,updating


You can see that the new version is on the running version and old version on the backup version.
Some cards needs reboot to reflect the current version. you may need a server reboot in that case.
and you can see the FI status as activating.


Well its very simple and the firmware is updated.

Thanks for reading

Jibby George


Monday, August 20, 2012

DFM error: Java.net.SocketException: No buffer space avaliable ( maximum connection reached)

NetApp Oncommand/DFM/NMC error: Java.net.SocketException: No buffer space avaliable ( maximum connection reached)

*Update-- The below solution worked for me temporarily. The permanent fix as to install the windows hotfix

Kernel sockets leak on a multiprocessor computer that is running Windows Server 2008 R2 or Windows 7

http://support.microsoft.com/kb/2577795


This is for my future reference:
This is the error i came across OnCommand running on windows 2008 R2 server.

The solution is to increase the connection in windows 2008 server.

1) Open the windows command line and check how many ports are opened.


C:\>netsh int ipv4 show dynamicport tcp

Protocol tcp Dynamic Port Range
---------------------------------
Start Port      : 49152
Number of Ports : 16384

2) Increase the number of ports with the command

C:\>netsh int ipv4 set dynamicportrange protocol=tcp startport=5000 numberofports=60536

3) confirm again

C:\>netsh int ipv4 show dynamicport tcp

Protocol tcp Dynamic Port Range
---------------------------------
Start Port      : 5000
Number of Ports : 60536


Thanks for reading.


Thursday, June 28, 2012

Configure OnCommand DFM to discover NetApp filer in different subnet

This is a requirement when you install OnCommand DFM server in the management network and you need to discover the NetApp filer through the different network like NFS network.

If you have the Management IP configured for the NetApp, DFM will discover the Filer through the management network. If you have vFiler configured in a different network (Vlan) , the DFM wont discover the vFiler.

This is also a requirement for the VSC when installed on the OnCommand server. VSC will show all the filers and vFilers in the monitoring and host configuration through the management IP address but the vFiler will fail to discover in the backup and recovery section as a result you wont be able to do any backup on the datastore presented through the vfiler

To overcome this, you need to configure DFM server with 2 interfaces, one in the managemet and other one in the NFS ( in my case). The DFM server is a VM in my case.

By default DFM discover appliance in the same subnet, to discover appliance in the different subnet you need to do the following:

( 192.168.15.x is my management and 192.168.90.x is my storage network)

1) Create an SNMP in the subnet

# dfm snmp add -m 24 -v 1 -c public 192.169.90.200

where 192.168.90.200 is the ip address of the netapp filer on a different vlan

2) Check whether the host is added through the management IP address

# dfm host list

4) If the host is not added add the host


# dfm host add
 # dfm host list

5) now you can see the host added through the management interface, if you do a host diag you can see it wont work for 90 network

# dfm host diag 192.168.15.200
#dfm host diag 192.168.90.200

6) Now you have to change the appliance primary path

# dfm host set < hostname>  hostPrimaryAddress=192.168.90.200
# dfm host diag 192.168.90.200

You can see any vfiler on the NetApp controller also detected.

Thanks for reading...Jibby


Thursday, December 29, 2011

Flexpod components images

I got an opportunity to work on a Flexpod project. I took some pictures of each of the components and thought of put it here.

As you know the components are:
NetApp controller
Cisco UCS chassis with blades and fabric extender
Cisco Fabric interconnect
Cisco Nexus Switches

Below is the NetApp FAS 3240 with dual port 10G module which will be connected to the Nexus switch.
The cable used is fibre.


Below is the image of Nexus 5548up. This is the latest nexus switch in the 5500 platform where the "up" stands for unified port, which means each of the 32 fixed SFP ports can be individually configured for 1G,10G,10G with FCOE and with native fibre channel 1,2,4,8G line speed.


Below are the images of the Cisco Fabric interconnect , Cisco UCS 6120XP. This is a 1 RU fabric interconnect with 20 fixed ports with 10G Ethernet and FCOE SFP+   and 1 expansion slot.This supports up to 160 blade servers and 20 chassis in single domain. Cisco UCS manager is a software which is embedded with it.

There will be 2*6120XP interconnect which works as a cluster. One is primary and other is subordinate


Now the UCS chassis with blades and fabric extender. This is Cisco 5108 chassis with 8 hot swap fans, 4 power connections and 2 fabric extenders each with 10G ports.

Rear side of the chassis:


Front side of the Chassis with empty slots for blade:


Fabric extender with 4*10G FCOE connection. We used twinax cable to connect to Fabric interconnect


Cisco UCS blades, these are half width blades. 5100 chassis holds upto 4 full width blades and 8 half width blades. This is B230 blades. You can see 64GB SSD drives at the bottom of the blade.


The label on the B230 blade:


Blades with 2*SSD drives


Fully populated blade, inside view

32 memory slots and 2 cpu's all fully populated with 8GB memory stick


Chassis with blades 6*B230 blades. Total of 8 blades can be inserted.


I will post the Flexpod configuration and connectivity in the next post


Thursday, October 6, 2011

Installation of Solaris 10 Update 10 virtual machine on some versions of ESX might fail

Solaris Installation fails with kernel panic. This is because the of the memory size. Increase the memory size to 1.5GB.

Please refer Vmware kb 2007354.

http://kb.vmware.com/selfservice/microsites/search.do?language=en_US&cmd=displayKC&externalId=2007354